The interface
Everything Voxel Mode adds lives in five places. Once you know them, you know where to look for anything.
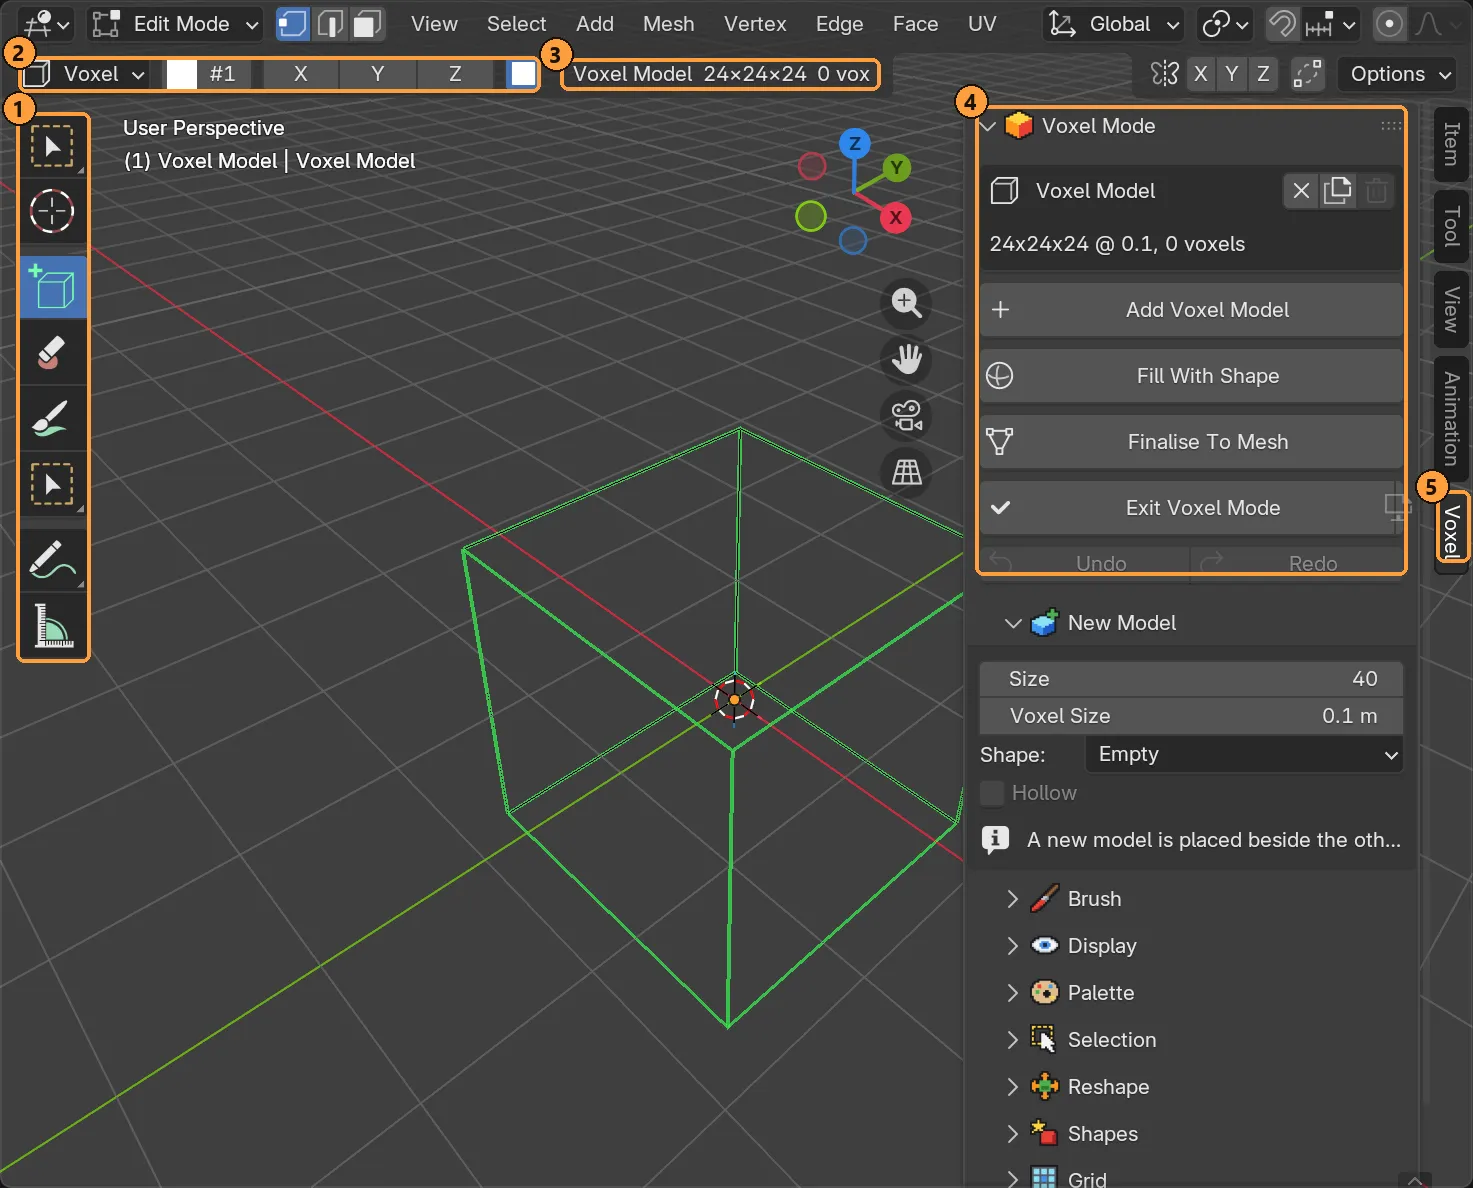
- The toolbar: the voxel tools, shown only while you edit a voxel model.
- The tool settings: brush shape, colour and mirror for the active tool.
- The status: model name, size, voxel count, and how many are selected.
- The Voxel tab: every panel the add-on has.
- The tab itself: click Voxel if another sidebar tab is showing.
1. The Voxel tab (sidebar)
Section titled “1. The Voxel tab (sidebar)”Press N in the 3D Viewport and click Voxel. The tab reads top to bottom in the order you work:
| Section | What it is for |
|---|---|
| Voxel Mode | The model you are working on: its name, size and voxel count, plus Add Voxel Model, Fill With Shape, Finalise To Mesh and Enter/Exit Voxel Mode. |
| Voxel Library | Browse and place ready-made shapes, and organise your own. |
| Character | Rig a model as a biped, quadruped or slime, then play and edit animations. |
| Voxel Generators | Fill the model with terrain, trees, buildings, whole scenes. |
| Voxelize Mesh | Turn an ordinary mesh into a voxel model. |
| Import | Open .vox files as editable models. |
| Export | Engine presets, .vox export, sprite sheets, the Unreal live link. |
Only Voxel Mode starts open; the rest cost one row each until you open them. Blender remembers what you opened, per file.
Inside Voxel Mode there are sub-panels:
| Sub-panel | Holds |
|---|---|
| New Model | Size, voxel size, starting shape and Hollow for the next new model |
| Brush | Lock To Plane, Match Colour, Fill Grid Sides, the Shape brush tip, Mirror X/Y/Z, Snap To Voxel Grid |
| Display | Cursor, pivot gizmo, bounds, other models’ bounds, the voxel grid overlay |
| Palette | The 256 swatches, primary and secondary colour, palette load/save, the built-in palettes |
| ↳ Material | Roughness, metallic, emission, opacity, specular, transmission and IOR of the picked swatch |
| Selection | Select all/none/invert, connected, grow/shrink, same colour; move, duplicate, rotate, scale, mirror, fill, delete |
| Reshape | Grow, Shrink and Hollow the model or the selection |
| Shapes | Place, save, import and export a single shape |
| Grid | Resize the model, change voxel size, rebuild, benchmark |
| Groups | Name the parts of a model for splitting and rigging |
| Rig (Advanced) | Preview the skeleton built from your groups |
2. The toolbar (Edit Mode)
Section titled “2. The toolbar (Edit Mode)”With a voxel model in Edit Mode, the toolbar on the left shows only the tools that do something here:
| Tool | Key | Does |
|---|---|---|
| Attach | D | Adds voxels |
| Erase | E | Removes voxels |
| Paint | R (or P) | Recolours voxels |
| Select | Q (or W, K) | Three tools in one slot: Select Voxels (box), Select Same Colour, Select Group |
Press Q again to cycle through the three select tools, or click and hold the toolbar button to pick one. Blender’s own 3D cursor, Annotate and Measure stay available too.
Edit an ordinary mesh and the toolbar is Blender’s own again. Voxel Mode’s tools and keys only answer on voxel models.
3. The tool header
Section titled “3. The tool header”Across the top of the viewport, the tool header shows:
- Status: the model’s name, its dimensions (
W×H×D), how many voxels it holds and how many are selected. - The active tool’s settings: brush shape, mirror, and so on.
While you drag, a short hint appears bottom-left in the viewport saying
what the current keys do, for example X/Y/Z lock R turn S size.
4. The settings pie
Section titled “4. The settings pie”Press Shift + Alt + S anywhere over the model and a pie opens under the mouse:
Lock To Plane │ Show Voxel Grid ───┼─── Fill Grid Sides │ Mirror X ───── ✦ ───── Mirror Y │ Match Colour ────┼─── Align To Voxel Grid │ Mirror ZPress, flick, release. Everything in it is also in the Brush panel; the pie just saves a trip to the top of the screen.
5. Viewport overlays
Section titled “5. Viewport overlays”| You see | It means |
|---|---|
| A green outline | The model you are editing |
| A yellow outline | The model under the mouse. Ctrl + Alt + click switches to it |
| A blue outline | Other voxel models (turn on Show Other Models in Display) |
| A white hover cube | Where a click will add |
| A red hover cube or box | What a click will erase |
| A coloured hover cube | What a paint click will write |
| Orange voxels | The selection |
| A white ghost | Where a move or duplicate will land |
| Three rings and a cross | The pivot, shown only while a rotate or scale is running |
Object Mode vs Edit Mode
Section titled “Object Mode vs Edit Mode”- Object Mode is for whole models: select, move, duplicate (Shift + D), delete (X) and resize (S). A voxel model behaves like any other object.
- Edit Mode (Tab) is for voxels. It’s where the tools, the palette and the selection work.
Menus Voxel Mode adds to
Section titled “Menus Voxel Mode adds to”| Menu | Entry |
|---|---|
| Add ▸ Voxel (Object Mode, Shift + A) | A new model in any starting shape, placed at the 3D cursor; Import Voxels (.vox); From Selected Mesh; From Finalised Voxel Mesh |
| Shift + A in Edit Mode | The Voxel Library, to place a shape |
| Object ▸ Convert | Finalise To Mesh, or rebuild a model from a finalised mesh |
| File ▸ Import | Voxels (.vox) |
| File ▸ Export | Voxel Model (.glb/.fbx) (engine presets) and Voxels (.vox) |
| Right-click a shape | Draw With it as a brush tip, Open it to correct it, Delete it |
A dedicated workspace (optional)
Section titled “A dedicated workspace (optional)”Turn on Use A Voxel Workspace in the preferences and a new model switches you to a Voxel workspace. It’s a copy of the one you were on, set to Solid shading with vertex colour so models look painted. The Voxel Workspace button in the Voxel tab does the same on demand.