Palette and materials
Every model has a palette of 256 entries. Entry 0 means “empty”, so 255 are usable colours. A voxel stores only its entry’s number, which has two useful consequences:
- Change a swatch and every voxel using it changes at once. There is no repainting, and no remeshing.
- Shading is a run of neighbouring entries. A smooth ramp from index 25 to 32 is how a face goes from lit to shadowed, which is why the built-in palettes are laid out as ramps.
Picking colours
Section titled “Picking colours”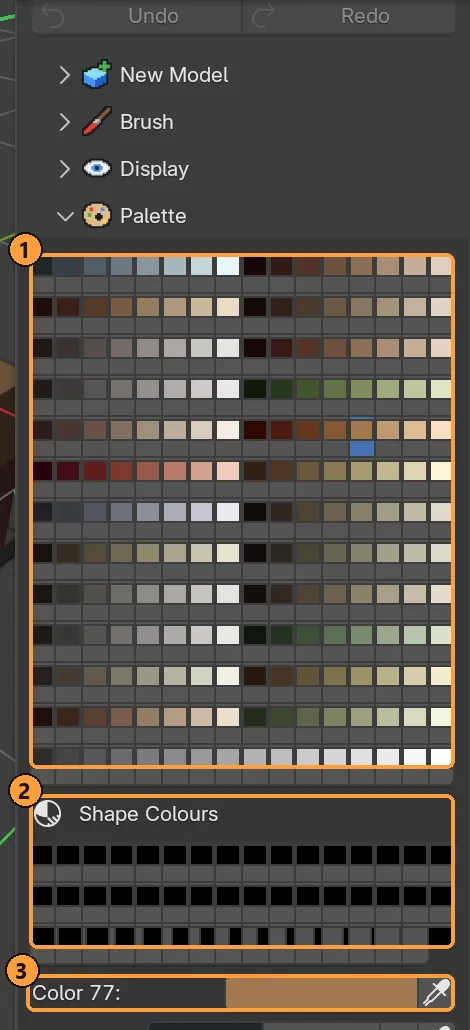
- The swatches: click one to paint with it.
- Shape Colours: the slots placed shapes fill with colours the palette didn’t have (see below).
- The active colour. Click it to edit the colour with Blender’s colour picker.
- Press C over the model: the palette pops up under the mouse. Click a swatch, or type its number, then Use (or Enter). Cancel closes it; with the keyboard, press Esc twice, because the first one only leaves the number field.
- Or open Voxel Mode ▸ Palette in the sidebar.
- Alt + click a voxel (or I) picks its colour as the primary.
- Shift + I picks it as the secondary, which Shift + click paints with on the Paint tool.
A swatch is a colour square inside a frame. Click the frame to pick that swatch. Click the colour to edit it in place with Blender’s colour picker.
Picking several swatches
Section titled “Picking several swatches”| Gesture | Does |
|---|---|
| Click | Pick one |
| Shift + click | Pick the whole run between it and the last one |
| Ctrl + click | Add or drop one |
| The three small buttons | Pick all, none, or every colour the model actually uses |
The brush still paints with one colour: the last swatch you clicked.
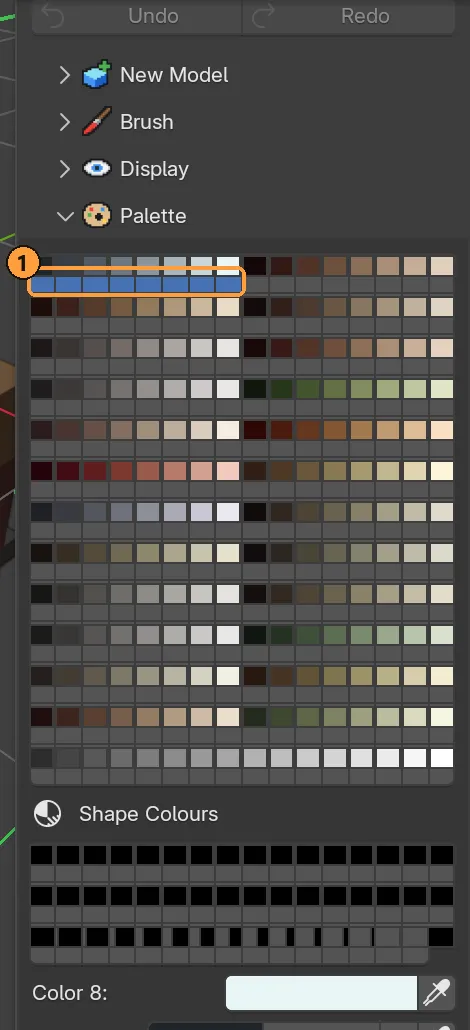
① Click swatch 1, then Shift-click swatch 8: the whole ramp is picked. Below the grid, the panel counts the picked swatches, and Gradient, Copy To Picked and Adjust Colours are now live.
With several picked:
- Gradient (Ctrl + G, over the sidebar) blends every entry between the two ends and leaves the ends as they were. The redo panel offers RGB, or around the colour wheel the short or long way.
- Copy To Picked copies the active swatch’s surface (roughness, metal and so on) onto the others. Colour is off by default.
- Adjust Colours shifts every picked colour around the wheel, or scales its saturation or brightness, keeping the shading. A set of greens becomes autumn oranges.
- Surface Preset and Reset Material act on all of them.
Materials: every swatch is one
Section titled “Materials: every swatch is one”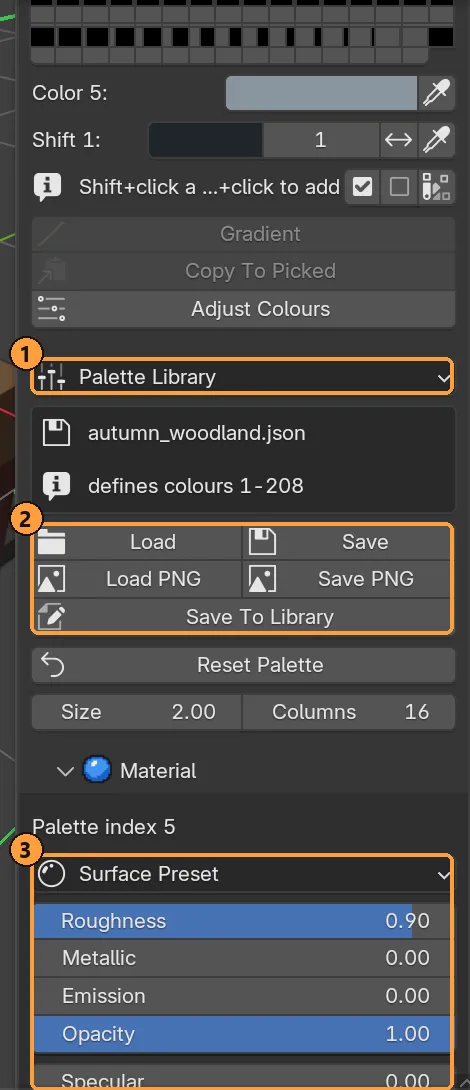
- Palette Library: the built-in palettes and your own.
- Load, Save, Load PNG, Save PNG, Save To Library.
- The picked swatch’s material: a preset, then roughness, metallic, emission, opacity, specular, transmission and IOR.
Open Palette ▸ Material with a swatch picked:
| Setting | Meaning |
|---|---|
| Roughness | Matte to glossy |
| Metallic | Dielectric to metal |
| Emission | Glow strength, in the swatch’s colour |
| Opacity | Alpha |
| Specular | Reflection strength of non-metals |
| Transmission | See-through, for glass, water and ice |
| IOR | Index of refraction for transmission (water 1.33, glass 1.5, ice 1.31) |
Changes show straight away. The whole model shares one Blender material.
Water, glass and ice
Section titled “Water, glass and ice”Load the Water and Glass built-in palette (or use Into Picked Swatches to bring it into an existing palette). It carries water, deep water, ice and glass entries with the right transmission and IOR. A water surface only reads as water when there is something above it to reflect and something below it to see through. A flat pool over an empty floor renders as a blue lid.
Shape Colours
Section titled “Shape Colours”The last row of the palette, slots 209–255, is Shape Colours. When you place a shape, or Scatter plants some, each of its colours goes to the same colour in your palette. A colour your palette doesn’t have is added here, so gold coins stay gold in a model painted from Autumn Woodland.
- Only slots that no voxel uses are filled, so nothing already painted changes.
- A colour that is already there is reused, not added again.
- If every Shape Colours slot is in use, the shape takes the nearest colour instead, and the report says so.
- The built-in palettes leave these slots free for exactly this.
Shape Colours slots are ordinary swatches: paint with them, edit them, or save them with the palette.
Built-in palettes
Section titled “Built-in palettes”23 ship with the add-on: Default Voxel Palette (the classic 256), Metals and Glow, Water and Glass, and twenty built for game art: Dungeon Stone, Verdant Forest, Desert Ruins, Frozen Tundra, Volcanic Ash, Coral Reef, Neon Cyberpunk, Pastel Village, Autumn Woodland, Deep Space, Haunted Swamp, Candy Kingdom, Steampunk Brass, Arctic Night, Savanna Plains, Toxic Wasteland, Royal Court, Pirate Cove, Mushroom Cavern and Retro Arcade.
Those twenty share one layout, so a model can switch between them and keep reading correctly:
| Indices | Holds |
|---|---|
| 1–96 | Twelve key colours, eight shading steps each (two ramps per row of 16) |
| 97–192 | A weathered version of each |
| 193–208 | Sixteen neutrals |
| 209–255 | Free: Shape Colours, filled by placed shapes |
Loading a palette replaces the whole palette by default. Voxels keep their numbers, so a finished model re-tints where it stands. Into Picked Swatches writes the palette only into the swatches you picked, which is the safe way to add a second palette to a half-painted model.
Palette files
Section titled “Palette files”| Button | Format | Carries |
|---|---|---|
| Load / Save | .json |
Colours and materials |
| Load PNG / Save PNG | .png, 256 × 1 |
Colours only, as a palette strip image |
| Save To Library | .json |
Adds the palette to the dropdown |
Palette Library is a dropdown of the built-ins plus every .json and .png
in your palette folder (set it in the preferences).
A partial palette, such as a strip of twenty swatches, blanks the entries it does not define, to black by default. Choose white or Keep if you prefer. Blanking never touches materials.
Reset Palette puts the default palette back.
Swatch size
Section titled “Swatch size”Swatch Columns is the real size control: 16 fits the palette in 16 rows, and 8 makes each swatch twice as wide with one ramp per row. Swatch Size is a maximum. Widen the sidebar to make swatches bigger.